Master Multi-Parallel Compression for Vocals in Pro Tools
When it comes to recording and mixing vocals, achieving the perfect balance of clarity, punch, warmth, and emotion can feel like walking a tightrope. Over the years, I’ve relied on a powerful technique called Multi-Parallel Compression to create polished, high-end vocals that sit perfectly in the mix. In this post, I’ll break down what this technique is, why it’s worth mastering, and, most importantly, how to achieve it using stock plugins in Pro Tools.
What is Multi-Parallel Compression?
At its core, Multi-Parallel Compression is a dynamic processing method where a vocal track is sent to multiple aux tracks, each with unique compressor settings. By blending these processed signals back into the original vocal, you create a sound that is thick, clear, and full of energy—all while preserving the natural dynamics.
🔗 Want to nail the perfect compressor attack and release times? Use the Tempo Calculator to get spot-on millisecond values based on your track’s tempo. Think of it as layering: each parallel chain serves a unique purpose, adding depth and dimension to the overall vocal mix. For instance, one chain can focus on warmth and body, another on clarity and sparkle, and a third on adding punch and attitude.
Why Use Multi-Parallel Compression?
This technique is ideal for vocals because it allows you to:
- Enhance Dynamics: Highlight the softer nuances of a vocal while controlling the louder peaks.
- Add Thickness: Introduce body and warmth to thin or weak vocals without overpowering the mix.
- Maintain Clarity: Blend brightness and clarity without the vocal becoming harsh or sibilant.
- Gain Flexibility: Tailor the tone and dynamics to perfectly suit the track’s genre and emotional intent.
Create a Signature Sound: Combine subtle effects, compression, and EQ to develop a distinct vocal character that sets your mix apart.
How Multi-Parallel Compression Shaped Iconic Tracks
I’ve used this technique on some of the most memorable tracks of my career. For instance:
- Lionel Richie’s “Forever”: Multi-parallel compression brought out the richness of Richie’s vocal performance, emphasizing both the emotional depth and the clarity of his delivery.
- Stevie Wonder’s “Misrepresented People”: This song called for a powerful vocal presence. By blending multiple compression chains, I achieved a balance of punch and warmth that elevated the vocal to fit the track’s soulful energy.
These examples demonstrate the versatility of this technique across genres and emotional tones.
How to Use Pro Tools for Multi-Parallel Compression
Step 1: Session Preparation
- Create Your Vocal Track: Import or record your main vocal track and ensure it is clean (edit out unnecessary breaths, clicks, and pops).
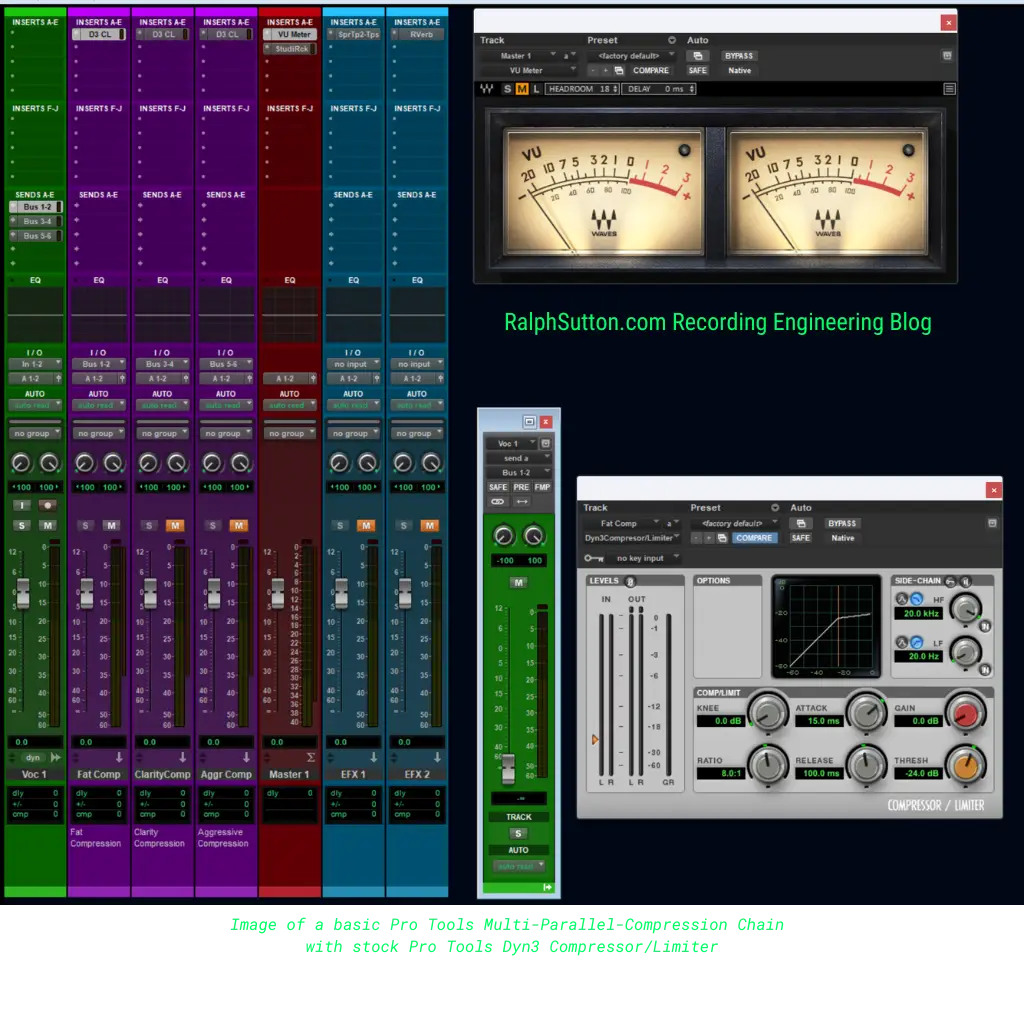
- Set Up Aux Tracks for Parallel Chains: Create three aux tracks (mono or stereo, depending on your vocal). Name them for clarity: Fat Compression, Clarity Compression, and Aggressive Compression.
- Assign Inputs to Aux Tracks: Set each aux track to receive audio from a dedicated bus.
- Send the Vocal to the Aux Tracks: Keep the send levels at unity gain (0 dB) initially and set sends to pre-fader.
Route All Tracks to a Vocal Bus: Create a vocal submaster/bus for easy control and final processing.

Step 2: Applying Compression with Stock Pro Tools Plugins
Each chain has its purpose:
Chain 1: Fat Compression (Body and Warmth)
- Purpose: Adds thickness and sustain to the vocal, giving it a strong foundation.
- Settings:
- Ratio: 8:1
- Attack: Slow (15–25ms)
- Release: Medium (100–200ms)
- Threshold: 10–15 dB gain reduction during loud parts.

🔗 For precise attack and release settings, use the Tempo Calculator to convert your project’s tempo into spot-on millisecond values.
Chain 2: Clarity Compression (Air and Sparkle)
- Purpose: Enhances brightness and articulation.
- Settings:
- Ratio: 3:1
- Attack: Fast (5–10ms)
- Release: Fast (50ms)
- Threshold: 3–5 dB gain reduction on peaks.
🔗 Get precise compressor settings for clarity by visiting the Tempo Calculator.
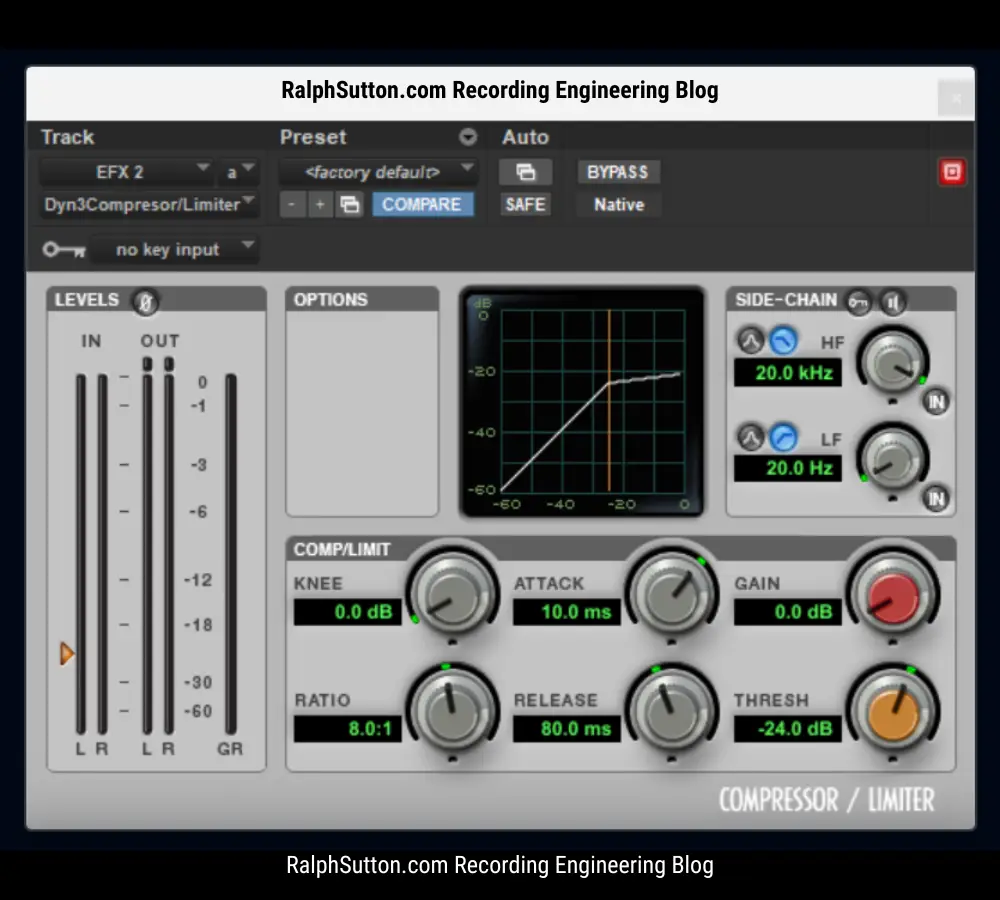
Chain 3: Aggressive Compression (Punch and Presence)
- Purpose: Adds energy and attitude, bringing the vocal forward in the mix.
- Settings:
- Ratio: 10:1
- Attack: Fast (1–5ms)
- Release: Fast (50ms)
- Threshold: 10–15 dB gain reduction for an in-your-face sound.
🔗 Dial in perfect timing with the Tempo Calculator to match your compression settings to your mix.
Enhancing Multi-Parallel Compression Across Genres
Multi-parallel compression can be adapted to various genres:
- Pop: Use a brighter EQ boost on the Clarity Compression chain to make vocals cut through dense arrangements.
- Jazz: Focus on warmth and natural dynamics by favoring the Fat Compression chain and dialing back aggressive settings.
- Soul and R&B: Balance all chains evenly to preserve the emotional texture of the vocal.
🔗 Looking for EQ tips tailored to Jazz, Funk, and R&B? Check out my EQ Cheat Sheet for Jazz, Funk, and R&B Mixing.
Step 3: Blending the Chains
- Balance the Aux Tracks:
- Bring up each aux track fader and adjust the levels to taste.
- Start with the Fat Compression chain as the foundation, then layer in the Clarity and Aggressive chains until the vocal feels balanced.
- Fine-Tune with EQ:
- Insert EQ3 7-Band EQ on the vocal bus for subtle adjustments to the overall tonal balance.
🔗 Need inspiration for EQ settings? Visit my EQ Cheat Sheet for foundational male and female vocal settings.
- Insert EQ3 7-Band EQ on the vocal bus for subtle adjustments to the overall tonal balance.
- Add Final Processing:
- Use a De-Esser to control sibilance.
- Apply Reverb or Delay:
- 🔗 For reverb times based on tempo, use the Reverb Time Calculator.
- 🔗 For tempo-based delays, check out the Tempo Calculator
Enhancing Multi-Parallel Compression Across Genres
Multi-parallel compression can be adapted to various genres:
- Pop: Use a brighter EQ boost on the Clarity Compression chain to make vocals cut through dense arrangements.
- Jazz: Focus on warmth and natural dynamics by favoring the Fat Compression chain and dialing back aggressive settings.
Soul and R&B: Balance all chains evenly to preserve the emotional texture of the vocal..
Common Pitfalls and How to Avoid Them
- Over compression:
- Problem: Overloading chains can squash dynamics.
- Solution: Monitor each chain’s level and blend carefully.
- Phase Issues:
- Problem: Incorrect routing can cause phase cancellation.
Solution: Ensure sends are properly aligned and routed.
FAQs About Multi-Parallel Compression
Q: Can I use this technique for instruments?
A: Absolutely! Multi-parallel compression is also effective for drums, bass, and even guitars.
Q: Do I need expensive plugins?
A: No! Stock Pro Tools plugins are perfectly capable of achieving high-end results.
A Brief History of Parallel Compression
Parallel compression originated as a way to retain natural dynamics while adding controlled compression. Engineers such as myself in the analog era routed signals through outboard compressors and re-blended them manually. Modern DAWs like Pro Tools have made this process more accessible and flexible.
Multi-parallel compression is more than just a technique—it’s a game-changer for vocal mixing. By splitting your vocal into multiple parallel chains and fine-tuning each one, you can craft a mix that’s dynamic, rich, and full of character—all while preserving the natural emotion of the performance.
The beauty of this method lies in its adaptability. Whether you’re mixing a soulful ballad, a high-energy pop anthem, or an indie gem, multi-parallel compression can be tailored to fit the unique vibe of any track.
I challenge you to use this technique on your next session. Open Pro Tools, set up those chains, and experiment with the stock plugins. Push the boundaries, tweak the settings, and see how this technique transforms your vocals.
If you have questions or need expert advice on taking your mixes to the next level, feel free to Contact Me Directly.
Stay creative. Stay inspired. Keep it Funky.
Ralph “P-Funk” Sutton 🎛️
