
Mixing Vocals in Pro Tools: The Ultimate Stock Plugin Guide
In this guide, I’ll walk you through step-by-step techniques to mix vocals like a pro. Plus, I’ll show you how to use exclusive Tools and Resources available on RalphSutton.com to elevate your vocal mixes.
1. Preparing Your Vocal Track: Cleaning and Prepping
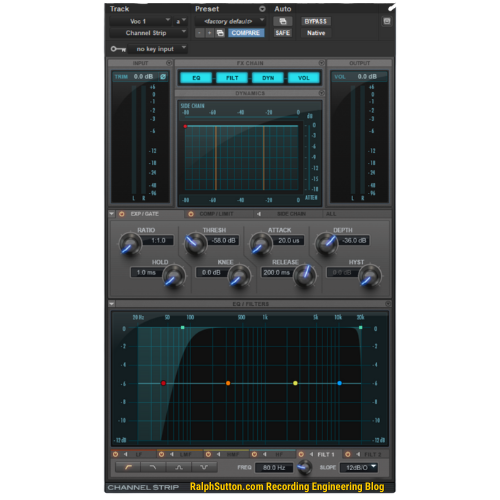
Before diving into mixing, it’s essential to clean up your vocal recordings. Stock plugins like Avid Channel Strip are perfect for this step.
Steps to Clean Up Vocals:
Noise Reduction: Use the gate feature in the Channel Strip to eliminate background noise and unwanted breaths.
EQ Cleanup: Apply a high-pass filter to remove low-end rumble (start around 80 Hz).
✅ Pro Tip: Refer to my Frequency Chart for Instrument EQ to identify problem frequencies specific to vocal recordings and solve common EQ challenges. to target problem frequencies specific to vocal recordings. This resource is especially useful for pinpointing troublesome areas in your tracks.
2. Shaping Vocals with EQ: Enhancing Clarity and Tone
Pro Tools’ EQ3 7-Band plugin is a workhorse for shaping vocal tone and enhancing clarity. Use this tool to achieve the best EQ3 7-Band settings for vocal clarity. With a few tweaks, you can make vocals sound clear and balanced.

Key EQ Techniques:
Cut the Muddiness: Remove frequencies around 200 Hz to 300 Hz for clearer vocals.
Enhance Presence: Boost between 2 kHz and 4 kHz to add clarity and make vocals pop.
Add Air: Apply a gentle shelf boost at 10 kHz for brightness.
✅ Pro Tip: My EQ Cheat Sheet is a great resource for fine-tuning vocal EQ settings and solving common problems like harshness or dullness.

3. Controlling Dynamics: Compression Techniques
Dynamic control is crucial for vocals. Use the Dyn3 Compressor/Limiter to smooth out vocal levels and apply the best compressor settings for Pro Tools vocals. while maintaining energy and emotion.
Compression Settings:
Ratio: Start with 3:1 to 4:1 for vocals.
Attack and Release: Use a medium attack (10 ms) to retain transients and a fast release (50-100 ms) for natural dynamics.
✅ Pro Tip: Experiment with parallel compression by duplicating the vocal track, compressing the duplicate heavily, and blending it back with the original. For additional settings guidance, check out my Compression Settings Guide.

4. Adding Depth and Space: Reverb and Delay Techniques
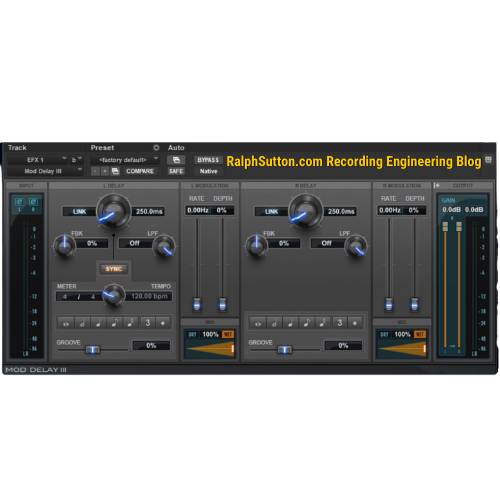
To create depth and space in your vocal mix, turn to D-Verb and Mod Delay III plugins. Explore vocal reverb techniques and delay settings for vocals in Pro Tools to enhance your mix..
Reverb Settings:
Use D-Verb’s Hall mode for a natural reverb effect.
Set decay to 2-3 seconds and pre-delay to around 30 ms to maintain clarity.
✅ Pro Tip: Calculate precise pre-delay times with my Reverb Time Calculator to match your track’s tempo.
Delay Settings:
Use Mod Delay III for a subtle 1/8-note delay on vocals.
Adjust feedback to around 20% and mix level to -10 dB for a polished echo effect.
For exact delay times, use my Tempo Calculator to ensure your delays sit perfectly in the mix.

5. Enhancing the Stereo Image: Width and Depth
Vocals that feel wide and immersive can elevate a mix. Use the AIR Chorus or automate panning for creative stereo effects.
✅ Pro Tip: My Stereo Imaging Width Guide provides detailed strategies to enhance vocal width while maintaining clarity and balance.
6. Automation: Polishing Your Mix
Automation is a powerful way to add emotion and interest to your vocal mix. Learn essential Pro Tools vocal automation tips to create dynamic and engaging tracks. Use volume automation to emphasize key phrases and ensure consistent vocal presence throughout the mix.
Steps to Automate:
Automate the vocal track’s volume to highlight important lyrics.
Use automation on reverb and delay sends to create dynamic effects (e.g., longer reverb tails during choruses).
✅ Pro Tip: For complex mixes, consider referencing my Dolby Atmos Width Guide for advanced spatial mixing techniques.
Bonus Tip for Advanced Users
For more experienced engineers, try experimenting with harmonic layering, Multi-Parallel Compression and vocal effects automation to add depth and complexity to your mixes. Harmonic layering involves duplicating the vocal track, applying slight pitch shifts, and blending them back into the mix to create a fuller, richer sound. For automation, dynamically control reverb or delay sends to add interest and drama to specific parts of the vocal performance.
Frequently Asked Questions
1. Can I mix professional vocals using Pro Tools stock plugins?
Absolutely! Pro Tools stock plugins are incredibly versatile and capable of delivering professional-quality mixes. With the right techniques—like those outlined in this post—you can achieve polished, radio-ready vocal mixes without third-party plugins.
2. What is the best way to EQ vocals in Pro Tools?
Use the EQ3 7-Band plugin to:
Remove low-end rumble with a high-pass filter.
Enhance vocal clarity by boosting 2 kHz to 4 kHz.
Add brightness with a gentle high-shelf boost around 10 kHz. For detailed guidance, refer to my EQ Cheat Sheet.
3. How do I calculate delay times to match my track’s tempo?
Use my Tempo Calculator to find precise delay times based on your song’s BPM. Matching delay times to the tempo ensures a cohesive and professional sound.
4. How can I make vocals stand out in a dense mix using Pro Tools?
Use compression to control dynamics and bring the vocals forward.
Apply EQ cuts to competing instruments in the 2 kHz to 4 kHz range.
Add subtle delay and reverb to create depth without losing clarity.
5. How important is automation in vocal mixing?
Automation is crucial for adding emotion and dynamics to your mix. It allows you to emphasize key phrases, control effects, and ensure the vocals remain engaging throughout the track.
Conclusion
Mixing vocals with Pro Tools stock plugins doesn’t just save money—it gives you the power to achieve a professional, polished sound without extra costs. This guide walks you through essential techniques to shape, control, and enhance your vocals using only the built-in tools in Pro Tools. Whether you’re in a professional studio or a home setup, these techniques will elevate your vocal mixes. From cleaning and shaping to adding depth and automation, Pro Tools provides all the tools you need to create professional-quality vocal mixes.
Ready to take your vocal mixes to the next level? Dive into these techniques, use my tools and resources, and watch your mixes come to life.
Explore More: Check out my Recording Engineering Blog for additional tips and resources.
Share Your Techniques
What’s your favorite tip for mixing vocals? Let me know in the comments! I’d love to hear how you approach creating standout vocal mixes, whether you’re using stock plugins or advanced techniques.